Return Home |
|
NOTE: Make sure your speakers are ON for these videos.
Larger Working Areas--as long as you have a decent graphics card, the program can now use all of the available space for the live view and live blueprint view often giving you nearly 30% more working space!
NOTE: The first time you launch Version 3.6, it will do a "stress test" to determine whether you graphics card can handle it (almost all of them can) and then set the larger working area automatically.
New optically reflective mirrored objects
-- Version 3.6 now renders optically
accurate reflections in mirrors, allowing
you to truly plan shots involving mirrors
while avoiding what happens to this hapless
cameraman.
Like lighting and shadows, reflections are automatically "dropped out" when you are moving cameras or manipulating objects in order to maintain program responsiveness, then they kick back in when the program is idle again.
You can control the display of the mirror reflections by going to the View and selecting Lighting, Shadows and Mirrors and selecting the desired option.
NOTES ON MIRRORS
- If you are setting up a shot
where you need the reflections more than you need the fastest
program response then you can go to the VIEW menu, select
Lighting, Shadows and Mirrors and select ALWAYS
show Mirror Reflections at which point, the program will
not drop out the reflections even if that means that the program
becomes somewhat sluggish.
We HIGHLY recommend that you turn this off when you are done setting up that shot.
- The mirrors on cars are set to not reflect by default ON SCREEN because in most cases you don't care about them, so why spend the extra time rendering them. If you want them displayed on screen, then bring the car into the Green Room and change the option for Reflective Mirrors to Reflective On Set.
- Like other objects, mirrors can be tinted and made transparent as needed.
New Room Builder
The new Room Builder is accessed very simply when you are in the Blueprint View there are now two buttons to the right of the view Standard Blueprint Mode and Room Builder Mode and you should just select the desired one to instantly switch between them.
New Room Builder Features include:
- Can load a blueprint and lay down
walls directly on it
- Easy Sizing of Blueprints to match their real-world sizing
The videos explains below the relevant features.
- Can Draw Walls at Any Angle
- Fully integrated Curved Walls
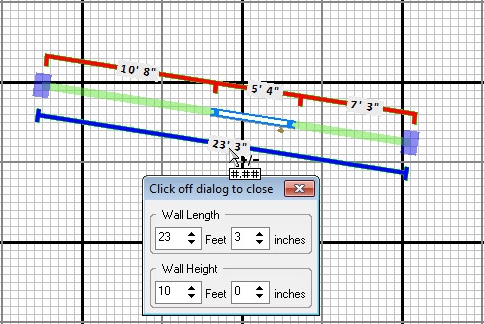
NOTE: If you want to set any wall's parameters explicitly--e.g. to make a window exactly 5'4" wide, or a door 4' tall--cursor over to the parameter you want to change as shown in the image below.
The cursor will change into an arrow with #.## below it (see image) to tell you that you can edit the number at which point you should simply click and a pop-up dialog will appear with the values associated with that parameter as shown below.
Also, be aware that if you want to change the wall's height, simply click on the length and the pop-up will allow you to specify both the wall's length and height as you can see:
Additional Room Builder Capabilities include:
- Fully Integrated
into Blueprint View
- Allows you to add set dressing at same time as building rooms
- Full zoom and scroll with no restrictions
- Walls will now snap together when an edge hits a middle area of another wall, not just at the ends
- Can Freely Rotate Walls and Rooms
- New Room Builder Viewing
Options (available on the room
builder panel on the right of the
blueprint view which automatically
appears when you enter Room Builder
Mode)
- Only Show Walls
- Show Walls and all Set Dressing and Actors
- Only Show Walls and objects marked as "Honorary Walls" allowing you to hide all your set dressing, for example, but still show architectural elements such as pillars and staircases that are effectively part of the structure you're building
- More Intuitive Interface for faster construction
Automatic Room Layout Adjustments when resizing Rooms
- When you resize a room in Room Builder that is already dressed, the set dressing will automatically shift to maintain their relative positions in the room, if you don't want this to happen, just resize the room on the set, rather than in Room Builder Mode.
Window & Door Improvements
- Windows now automatically have a frame with glass, including curved walls, which have curved windows/glass
- Doors now automatically have knobs on them
- All new Door & Window Objects found under the Walls Category in the Object Library
- Auto-sizing & Auto-Snapping Doors and Windows. If you want a window that opens or just has more details to it than just a sheet of glass, or a door with a push bar or glass insets...
- Go to the Walls category in the Object Library, and open the desired sub-category, Doors or Windows
- Drag the desired door or window on the set.
- Make sure the wall in which you want to put this door or window already has a standard door or window in it. If it doesn't, go into Room Builder and add it.
- Simply drag the door or window object onto the existing door or window and FrameForge will automatically snap it into the door or window opening and remove the existing one. If you later change the size of the window, it will automatically adjust the size of the window object as well.
30 New and Improved Facial Expressions and Facial Modifiers -- create even more drama and impact in your scenes with new facial expressions such as Concern, Pout, Smells Bad, Kiss and Stubborn along with facial modifiers such as Cheeks Puffed Out, Epicanthic Fold, and Eyebrows Tented a along with a revised Expression Editor for easier access to exactly what you want.
More Control on how Textures are Tiled on Walls -- when you apply a wall texture in the Green Room, you now have control over both horizontal and vertical tiling separately in addition to having the option to have it maintain the original texture's aspect ratio or not
More Control on Auto-sizing Floors and Ceilings - -- you can select only certain walls of a larger structure, or all of the walls of a not completely enclosed room, drag in an auto-sizing floor or ceiling and it will fill the area that is selected.
New Snap-Together, Curvable Roads ---- New Curvable Road Objects (found under Outdoors -> Roads in the Object Library) function like the curvable walls, allowing you to stretch and curve them to exactly match whatever you need.
Fully Posable Low Resolution Actors for crowds (also included in Stock Sets, Second Edition Pack) found under Extras -> Men or Women. They are fully capable of all the poses and relationships that the normal actors are, though they are far more basic and put significantly less strain on the rendering.
Multiple Camera Types (aspect ratios, film/sensor sizes, etc.) on set at the same time (PRO & STEREO EDITIONS ONLY) -- in the Pro and Stereo Editions, you can now override the optical properties of any camera on the set (including focal length range and/or prime sets) so that you could have both a super 16 and a Red Camera on the set at the same time and the program will handle the camera differences automatically. The video below explains how this works.
Air Transparency (Fog) (PRO & STEREO EDITIONS ONLY) -- you now have full control over air transparency/fog, allowing you even further control over the look of your shots. To access the Fog Control Panel, you must be running either a Pro or Stereo version of FrameForge, and you should click the Lighting tab over the Object Library. On the Lighting Panel, at the bottom of the Sun settings will be a button labeled Air Transparency (fog) click it to show all the fog controls.
Return to Main Page Purchase Upgrade
Back to What's New in Version 4.0